Last Updated on December 17, 2025 by Wahid
Fabric tools are specialized instruments designed to manipulate textiles without disrupting the weave or damaging fibers. According to Standard Garment Construction Manuals, using the correct tool for specific fabric weights—such as employing micro-serrated shears for silk versus heavy-duty shears for denim—is the primary factor in preventing fraying and structural distortion.
In my years of sewing at home, I learned this the hard way. I once ruined expensive satin by trying to cut it with standard office scissors; the fabric slipped, the edges chewed, and the project was unwearable. That experience taught me that a basic, high-quality toolkit is not a luxury—it is a requirement for any functional result.
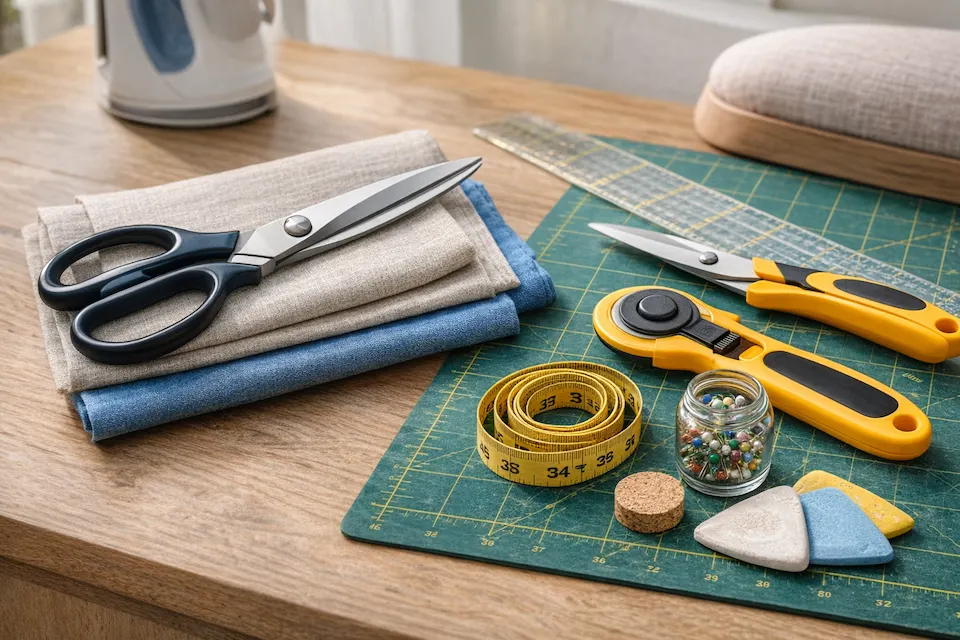
This guide outlines the core equipment needed for accurate cutting, measuring, and finishing. Keep reading to identify exactly which tools belong in your kit and which ones you can skip.
Fabric Cutting Tools (Precision & Safety)
Why it matters: Achieve clean, accurate cuts without fraying or damaging the fabric structure.
The quality of your finished project is determined the moment you cut the fabric. Uneven edges make accurate seam allowances impossible, leading to fitting issues later. Fabric cutting tools feature specific blade angles and sharpening techniques that differ vastly from standard household scissors.
Manual Cutting Tools
While technology has evolved, manual shears remain the extension of a tailor’s hand.
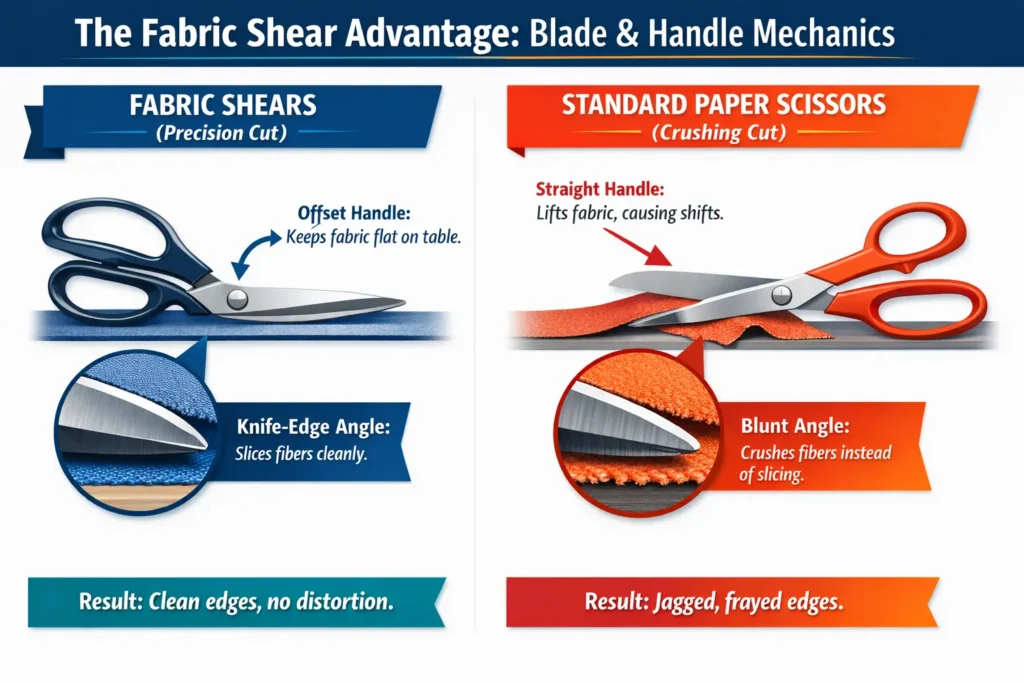
Fabric Shears vs. All-Purpose Scissors
The most common question beginners ask is, “Can I use regular scissors?” The answer is a strict no. According to blade manufacturing principles, regular scissors compromise fabric integrity for three key reasons:
- Offset Handle Benefit: Fabric shears feature a “bent” handle that allows the lower blade to slide flat, preventing the fabric from lifting or distorting.
- Paper Abrasion Issue: Paper is an abrasive material; cutting it with fabric shears dulls the blades instantly.
- Fabric “Chewing” Effect: Dull blades crush and “chew” the fabric fibers rather than slicing them cleanly.
Key Takeaway: Never use fabric shears on paper or other non-textile materials.
"If you're ready to buy, check out our list of the 10 Best Scissors For Cutting Fabric to find the perfect pair for your budget."
Pinking Shears
These shears have saw-toothed blades that cut a zigzag pattern instead of a straight line. By disrupting the weave structure, pinking shears stop thread fraying without the need for a serger [Source: Garment Construction Manuals].
- Best for: Finishing raw edges inside seams on woven cotton or linen.
- Limitation: Not suitable for precision cutting or heavy layers.
Thread Snips
Often overlooked, these spring-loaded mini scissors fit in the palm of your hand. They allow for rapid trimming of loose threads at the machine without the heavy lifting of large shears, improving workflow efficiency.
Rotary Cutters & Self-Healing Mats
For quilters and sewists working with long, straight lines, the rotary cutter is a game-changer. Think of it as a pizza cutter for fabric.
The Accuracy Advantage
Unlike scissors, which require an open-and-close motion that can create jagged edges (“choppiness”), a rotary cutter provides a continuous, smooth slice. This is critical for slippery fabrics like rayon or silk where lifting the fabric causes it to shift.
Safety & Mat Requirement
A rotary cutter is essentially a razor blade on a wheel. It must be used with a self-healing cutting mat to protect both the blade and your furniture.
On lightweight or slippery fabrics, always pair the cutter with an acrylic ruler to prevent blade drift. Always engage the safety latch when the tool is not in hand.
Maintenance Warning: Never expose self-healing mats to direct heat or sunlight, as warping reduces cutting accuracy permanently [Source: Mat Manufacturer Guidelines].
"Rotary Cutter Blade Size Guide"
Measuring Tools – The Foundation of Accuracy
Why it matters: Prevent fitting errors by ensuring 100% accurate measurements before cutting.
In sewing, a difference of 1/8th of an inch can determine whether a garment fits perfectly or pulls uncomfortably. Accuracy starts with the measuring tool itself.
Tape Measures (Fiberglass vs. Plastic)
Not all measuring tapes are created equal. The standard flexible tape found in cheap sewing kits is often made of stretchable plastic.
The Stretching Problem
Over time, cheaper plastic tapes can distort due to heat and tension, leading to significant measurement errors. If your tape has stretched, your pattern pieces will be cut too small.
The Fiberglass Solution
Professional-grade tapes are reinforced with fiberglass strands. This ensures the tape remains dimensionally stable and does not stretch or warp, regardless of temperature or usage [Source: Industrial Measurement Standards].
Pro Tip: Check your measuring tape periodically against a rigid ruler and replace it if it shows signs of stretching, unless it is a high-quality fiberglass reinforced model.
"To ensure smooth cuts and protect your furniture, always use your rotary cutter on a [dedicated fabric cutting table]."
Seam Gauges & Acrylic Rulers
While tape measures are for the body, rigid rulers are for the fabric.
Seam Gauge (The Hemming Hero)
This small, 6-inch metal ruler features a sliding marker. It is indispensable for measuring consistent hems, buttonhole spacing, and pleats. The slider allows you to mark the exact same distance repeatedly without re-measuring visually each time.
Clear Acrylic Rulers
Mandatory for rotary cutting. These transparent rulers allow you to see the fabric grainline underneath, ensuring perfectly squared cuts.
Marking Tools – Visibility vs. Removability
Why it matters: Create clear guidelines on fabric that can be removed safely without leaving permanent stains.
The challenge of marking is visibility versus removability. A mark that is easy to see on dark denim might be permanent on white silk.
Tailor’s Chalk
The classic choice for a reason, but the type of chalk matters.
- Clay Chalk: Best for cotton and wool. It brushes off easily but can be dusty.
- Wax Chalk: Designed for heavy wools and coatings.
- Fabric Safety Warning: Wax melts under iron heat. Never use wax chalk on fabrics that cannot be dry-cleaned or washed in hot water, as the grease stain may become permanent.
Water-Soluble & Air-Erasable Pens
Modern marker pens offer precision similar to a ballpoint pen, which is excellent for detailed embroidery or dart markings.
- Water-Soluble: The blue ink disappears when touched with water.
- Air-Erasable: The purple ink fades automatically within 12–24 hours.
Safety Note: On silk, rayon, or acetate, always test pens on a scrap piece first, as the water needed to remove the ink can leave permanent water rings or distort the fabric.
"Before you start slicing, ensure your measurements are precise. Check out our guide on [How to Cut Clothes Straight] for better accuracy."
Critical Warning (The “Ghost Mark” Risk)
Many popular heat-erasable pens (like Frixion) use thermochromic ink. While the ink disappears under the heat of an iron, it does not actually vanish—it becomes transparent.
In cold temperatures (like a freezing delivery truck or winter storage), the lines can reappear. Do not use heat-erasable pens on the exterior of a garment.
Holding Tools – Pins vs. Clips
Why it matters: Secure layers firmly without damaging the material.
Before sewing, layers must be held together to prevent shifting. The choice between pins and clips depends on the material’s density and vulnerability to permanent holes.
Glass Head Pins
Plastic-headed pins are common but dangerous. If the iron touches a plastic head, it melts instantly, ruining the pin and staining the fabric.
- Why Upgrade: Glass head pins are heat-resistant. You can iron over them without risk.
- Thickness Matters: Use “Silk Pins” (extra fine) for delicate materials to avoid leaving visible holes.
Sewing Clips (Wonder Clips)
Clips are strong plastic clamps with a flat base. They are the only safe option for materials where a pinhole is permanent, such as leather, vinyl, and waterproof canvas [Source: Material Handling Guidelines].
- Benefit: They hold thick stacks of binding that would bend a standard pin.
- Safety: Clips have no sharp points, making them safer if dropped on the floor.
Pressing & Finishing Tools
Why it matters: Shape the garment and set stitches for a professional result.
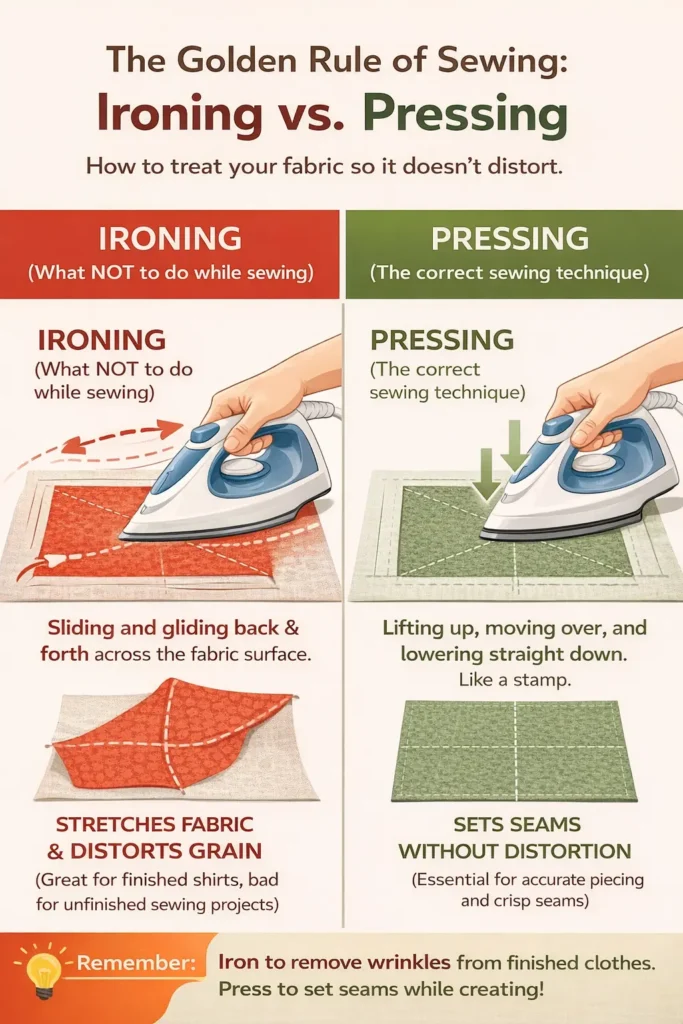
Sewing creates the structure; pressing creates the shape. A project that is sewn perfectly but not pressed will look homemade.
Irons & Steamers
- Steam Iron: The primary tool for most tasks. A high steam output is necessary to relax fibers and flatten seams.
- Gravity Feed Iron: Used in professional studios. It has a large separate water tank that provides high pressure and constant steam for hours.
- Vertical Steamer: Best for delicate fabrics like chiffon or velvet that cannot handle the weight of an iron plate.
Shaping Aids (Tailoring Essentials)
A flat ironing board cannot shape a curved body part.
- Tailor’s Ham: A firm, ham-shaped cushion used to press curves like darts, shoulders, and hip lines.
- Seam Roll: A long, cylindrical cushion. It allows you to press a seam open without imprinting the seam allowance onto the right side of the garment.
- Clapper: A hardwood block used immediately after steam. By trapping the heat and moisture in the fabric, it forces the seam to lie perfectly flat and crisp.
Pressing Cloths
A barrier layer between the iron and your garment. It prevents:
- Scorch Marks: On wool or cotton.
- Shine: On synthetic fabrics like polyester.
- Melting: On heat-sensitive prints or vinyl.
Fabric Bonding & Repair Tools
Why it matters: Fix mistakes and join materials without stitching.
Sometimes, a needle and thread are not the right solution. Adhesives offer a clean alternative for specific tasks.
Fabric Glues & Adhesives
- Permanent Glue: Used for attaching embellishments or repairing holes in heavy gear.
- Washable Glue: A temporary hold used instead of pins (basting) before sewing zippers or pockets.
- Fusible Hemming Tape: A double-sided adhesive strip that melts under heat. It allows for quick hemming on trousers or skirts without a single stitch.
"Not sure whether to stitch your fabric or stick it? Check out our comparison on [Fabric Glue vs. Sewing] to make the right choice."
Repair & Correction Tools
- Seam Rippers: The most used tool in any kit. Look for a sharp, fine point.
- Safety Tip: Use the red ball side inside the fold of the fabric to prevent accidental tears.
- Snag Nab-It: A specialized needle with a rough texture. It pulls a loose thread (snag) from the outside of a knit sweater to the inside, hiding it instantly.
Tool Maintenance & Storage
Why it matters: Keep expensive tools functional and safe for years.
Fabric tools are investments. Proper care prevents rust, dull blades, and mechanical failure.
Cutting Tool Care
- Sharpening: Fabric shears should be professionally sharpened once a year. DIY methods like cutting aluminum foil do not sharpen the steel; they only smooth out small burrs temporarily [Source: Professional Sharpening Services].
- Oiling: Apply a drop of sewing machine oil to the pivot screw of your scissors every few months to keep the action smooth. Wipe away excess oil before cutting fabric.
- Rotary Blades: These cannot be sharpened effectively at home. Replace the blade as soon as you notice skipped threads in your cuts.
Pressing Tool Care
- Soleplate Cleaning: Over time, fusible interfacing and starch build up on the iron. Use a hot iron cleaner (like a specialized paste or stick) to remove this residue.
- Descaling: If you use tap water, mineral deposits will clog the steam vents. Follow the manufacturer’s instructions to flush the tank regularly.
Choosing the Right Tool (Master Comparison)
Why it matters: Quick decision-making based on fabric type.
This table matches the fabric to the correct ecosystem of tools.
| Fabric Type | Best Cutting Tool | Safe Marking Tool | Pressing & Finishing |
| Cotton / Linen | Fabric Shears (8″) [Source: Textile Industry Standards] | Tailor’s Chalk [Source: Tailoring Best Practices] | Steam Iron (High Heat) |
| Silk / Satin | Rotary Cutter (28mm) [Source: Fabric Handling Manuals] | Air-Erasable Pen | Dry Iron + Press Cloth |
| Denim / Canvas | Heavy Duty Shears [Source: Material Density Data] | Wax Chalk | High Heat + Clapper |
| Wool | Fabric Shears [Source: Standard Tailoring] | Clay Chalk | Steam + Clapper |
| Knits (Jersey) | Rotary Cutter (45mm) [Source: Knitwear Guidelines] | Ballpoint Pins | Steam Only (No pressure) |
| Vinyl / Leather | Rotary Cutter [Source: Manufacturer Guidelines] | Clips (No Pins) | Teflon Foot / Finger Press |
Note: Always test your marking tool on a scrap piece of the same fabric before applying it to the main project.
Frequently Asked Questions (FAQ)
What is the difference between fabric scissors and regular scissors?
Fabric scissors feature a sharper blade angle and an offset handle that keeps fabric flat on the table during cutting. Standard scissors lift the material, which leads to jagged edges and uneven seams [Source: Scissor Geometry Principles].
Can I sharpen my own pinking shears?
No. Pinking shears require professional sharpening because the zig-zag teeth must be perfectly aligned to cut without chewing the fabric. DIY methods often ruin the mechanism permanently [Source: Manufacturer Recommendation].
Why do my rotary cutter blades get dull so fast?
Hitting metal pins or cutting on hard surfaces dulls the blade instantly. Always use a self-healing mat and remove pins before the blade reaches them to protect the edge.
Is fabric glue a permanent solution?
It varies by formula. Check the label: “permanent” glues withstand washing and are suitable for repairs, while “temporary” or “basting” glues are water-soluble and wash out.
Practical Recap & Next Steps
Quality results depend largely on having the correct equipment for the specific material you are handling. You do not need to acquire every item immediately.
Start with a sharp pair of shears, a fiberglass tape measure, and a safe marking tool. As your projects become more complex, you can introduce specialized items like rotary cutters and pressing hams to your kit.
Action Item:
Review our [Link to: Starter Sewing Kit Guide] for a detailed breakdown of the essential items needed for a beginner setup.