Last Updated on December 13, 2025 by Wahid
You can make your own grow bags (extra large, large, medium, and small) for your balcony, patio, or garden with our free instructions.
In general, plants can even grow better in the growing bag. How to make growing bags for gardening? Can you spare a cotton tote bag you’re no longer using? Obviously, rather than throwing it away, could you make a grow bag out of it to grow your houseplants?
The pots are inexpensive, lightweight, and compact, making them a smart choice over heavy plastic ones.
However, gardening with grow bags is great because you can use them almost anywhere. Whether you have a backyard garden or make the most of little corners on your balcony. Well, let’s see the easiest way to make grow bags and how can they use.
Grow Bags: What Are They? [Explained]
A grow bag is a bag that holds the growing medium and is used to grow crops. In addition to soil, organic materials can also be used as a growing medium.
A variety of sizes are available, and the bags are often made of breathable fabrics. Growing potatoes, okras, tomatoes, & salad crops in them is a great idea. Whenever grow bags are evaluated, their performance is typically compared to that of pots.
The following are a few advantages that grow bags have over pots:
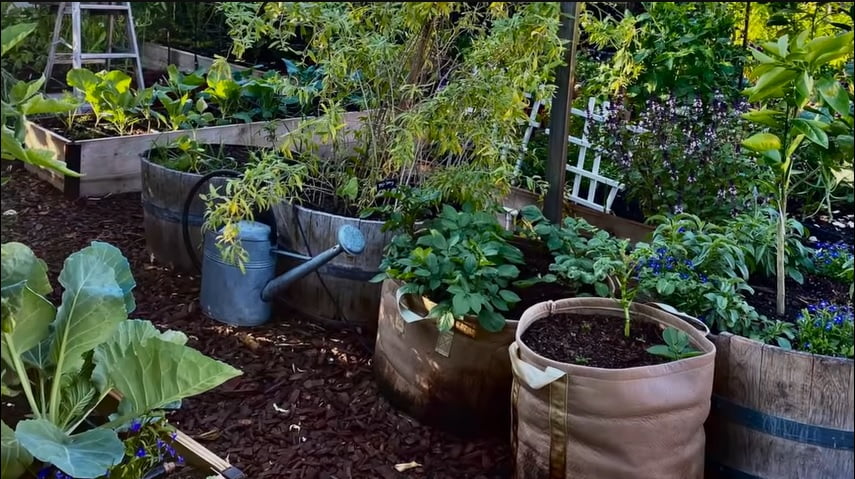
Gardening With Grow Bags

- The popularity of grow bags can be attributed to their ability to solve a number of gardening problems.
- With lightweight, durable fabric, they are cheap to make & fold up easily for storage.
- In a protected storage area, grow bags are ideal to store annuals, such as vegetables and flowers, or perennials.
- It is used to plant food crops, such as salad greens, carrots, herbs, and tomatoes for planting annual flowers.
- Using the grow bag’s roll-down sides, the bag can be set to any depth, adding just the right amount of planting mix needed.
- For decoration or to maximize growing space, you can hang grow bags on fences, gates, and raised beds.
- Growing bags are easily emptied & folded up at the end of the season, reducing their storage space requirements.
- Here’s the scoop straight from the experts: Make your own grow bags and grow your plants!
- Don’t waste any time, grab a tote bag & get started. Grow bags are easy to make, and you’ll have them within minutes.
What Is The Process For Making Fabric Grow Bags?

- Grow bags are made by sewing landscape fabric into a container. Handles can be added if you wish.
- In addition to holding its shape, the bag also holds potting mix.
- Here are sewing instructions that are universal: the steps are the same, regardless of how big or small the bag you are making.
- For starters, I’ve provided several sample sizes from mini through extra large (about the size of half a whiskey barrel).
- For beginners, it’s perfect because it’s simply straight stitching.
Fabric Grow Bags: Pros & Cons

- This type of project uses landscape fabric that comes in rolls & is extremely affordable. It can be found in the garden sections of home remodeling stores.
- Weed suppressants come in different strengths based on their suppression period (3,7, and 20 years).
- As intended, it does not suit your needs (in the garden, it’s a nightmare), however, it is inexpensive and easily sewn into these bags.
- In addition to being BPA-free, polypropylene, which makes yogurt containers, makes nonwoven fabrics lightweight & breathable.
- Based on the specs, they discharge no chemicals into the environment, making them perfect for growing food crops.
- Because grow bags provide better air circulation, plants naturally ‘air prune’ rather than growing too fast and circling around in plastic containers.
- Due to the lightweight fabric, it weighs only half an ounce (approximately 3.5 ounces). This fabric can fit inside a shoe, making it ideal for winter storage when space is limited.
Should Fabric Grow Bags Have Drainage Holes?
- Since grow bags are porous, water slowly seeps out and does not require drainage holes. In contrast to plastic pots, they are less effective at retaining moisture.
- In testing various sewing designs, we compared double-ply and single-grow bags.
- However, double-thickness undoubtedly offers greater strength and holds moisture longer. Hence, I’ve designed a two-layer pattern.
- The bags may need saucers if you are setting them on an outdoor patio & balcony to prevent water from dripping out.
- To prevent the bag from slipping, cover its bottom with extra fabric before planting. As long as I don’t severely overwater the bag, this isn’t a problem for me.
- For hot climates where grow bags will be placed in direct sunlight, consider 3 and 4-ply bags to further reduce water evaporation.
Materials Needed For Making Your Own Grow Bags

- Tote bag made of canvas
- Machine to sew (not required if you want to sew your bag by hand)
- Various types of scissors
- Markers such as chalk or pens
- Pins
- Rulers or measuring tapes
- Material for landscapes (durable, breathable material)
- Embroidery thread (high-quality outdoor thread)
Landscape fabric with weed-shield protection. If you want good quality, go for thicker materials. The nylon thread is used for sewing.
Upholstery thread was used for this project. It is recommended that polyester thread be used. Ensure your machine is capable of handling what you intend to do.
Cutting Of Growing Bags: Whole Process You Should Know

Grow bags can be made in any size if you want, regardless of what you plan to grow in them. There is no better size than a square foot. To make a 4-foot (1.22 m) square grow bag, include an inch around the seam. In order to get the right height, we simply divided the materials in half & it worked better.
- Using the material, fold the bottom and side & sew them together to make a bag.
- Make sure the bag’s corners are folded and secured.
- In order to make the inner square, you need to draw two lines. To do this, you can create a template. Approximately 6 inches (15 cm) from each corner will be required if your bag is square, and measures approximately 12 inches (30 cm) across the middle.
- Ensure that all corner lines are sewn.
- Depending on your preference, the bag’s top can be folded either twice or once.
- It’s exhausting to sew all the time. Take a break.
- The bags should be turned right side out. Thanks to two awesome helpers, we were able to get some things done.
- From the book All New Square Foot Gardening, fill the grow bags with Mel’s Mix. You can also use any soil that you like.
- Consider growing your own container garden. A container garden is a great way to grow food without having a lot of lands. The best way to grow plants in grow bags can also be found here.
Advantages Of Gardening With A Fabric Pot

- Fabric pots and grow bags have more advantages than disadvantages. Bags made of fabric are breathable, allowing air pruning as we mentioned earlier.
- When the root reaches the perimeter around the fabric planter, oxygen kills it off from the end. As a result, directly from the source, another root can grow for your plant.
- As the roots grow, the plant becomes stronger and grows faster above the ground surface. When the root structure is developed early on, there is a greater chance of keeping the plant’s original root structure after replanting.
- Traditional plastic pots are not as effective at controlling temperature & water content as grow bags.
- When it’s cold, the fabric keeps plants warmer. When it’s hot outside, the sun will keep your plant cooler, keeping it from overheating.
- Even though fabric bags require constant watering, they are less prone to retaining excess water than old plastic pots do. In general, using fabric bags reduces the likelihood of root rot.
FAQs
01. How should grow bags be made?
Typically, growing bags consist of nonwoven fabric, and are bonded using either heat & chemicals. For grow bag construction, nonwoven fabric is ideal. This is because it is naturally more breathable compared to woven fabric. However, this allows the soil to aerate and allows the plants to dry out between waterings.
02. Is it possible to make my own grow bag?
In contrast to containers, grow bags are not only easy to make but also inexpensive. Basically, a grow bag is made from breathable fabric, that provides superior drainage & aeration. Grow Bags can be bought ready-made or made yourself. Due to its simplicity, and since we wanted many, we decided on the DIY version.
03. What are the materials you use to make grow bags?
A grow bag is usually made from felt as well as other nonwoven pressed fabrics. Designed with small holes so that air can freely circulate. The roots benefit from this free flow of air since it allows them to ingest water & nutrients more efficiently.
04. Does mold grow on Grow bags?
Mold can grow in grow bags if there is too much moisture and not enough light. A few things that can be used to get rid of mold are baking soda, vinegar, and hydrogen peroxide. Grow bags can be kept mold-free by keeping them in enough sunlight, where they won’t remain moist all the time.
05. Bags or pots: which one is better?
The drainage of grow bags is better than that of traditional pots. Therefore, evaporation and seepage lose more water. Unlike pots, grow bags are more likely to lose moisture faster, particularly in climates with high temperatures or low humidity.
06. Do grow bags need to be watered regularly?
In part due to their well-aerated design, plant pots quickly lose moisture once plants are positioned inside them. The bags will probably need watering every day in the summer. Often, lifting one corner of a container will indicate whether extra water is needed.
07. Is landscape fabric suitable for grow bags?
In order to create grow bags, several strips of landscape fabric are sewed together to create a container. It is optional to add handles. Adding potting mix makes the bag hold its shape. You can make any size bag using these instructions: they work regardless of the size.
08. Are grow bags reusable more than once?
There is microbial life in your old growbag and you can reuse it. Plants like tomato plants are done, & you think the grow bag is too. However, avoid throwing away the bag by putting the soil back during winter cultivation. Your grow bags mould can easily be reused again.
09. Do grow bags allow you to overwater tomatoes?
Water regularly and avoid overwatering or submerging. You can both kill your tomato plant by doing either of these things. Put a water tray beneath your bucket or grow bag to encourage roots to self-water from the top down.
10. Are grow bags suitable for growing chillies?
Chillies can be grown in grow bags as an alternative to pots. Grow bags should be at least 50 cm (20 inches) deep and 30 centimeters (12 inches) in diameter. It’s best to start small as chillies need a confined growing environment to grow healthy roots.
11. Are grow bags possible to sew by hand?
Machines make the process much easier. Usually, grow bags are difficult to sew by hand. The fabric can be stapled instead of sewn if you don’t have a sewing machine.
Grow bags can be easily made at home. As it is difficult to sew everything by hand, it is best to use a sewing machine.
12. Do grow bags work for growing vegetables?
Grow bags can be used to grow almost any plant. However, some plants and vegetables are more suitable for growing bags than others. In grow bags, you obviously can grow tomatoes, herbs, aubergines, leafy vegetables, lemongrass, chillies, and cucumbers. Potatoes can even be grown using grow bags, however, there are simpler ways.
13. Is it necessary to have drainage holes in grow bags?
If the grow bag is made of porous breathable material, drainage holes are not required. There will be no excess water to drain off. In contrast to pots and drainage holes, water drains more slowly depending on the fabric used.
In Summary
You obviously understand how to make growing bags for you? In conclusion, it is not complicated to make grow bags. You should try it. After you get started making grow bags, you’ll be making them with ease, & you’ll appreciate it.
A grow bag is simple to create, inexpensive, as well as breathable fabric, so it offers superior drainage & aeration to containers. Make your own Grow Bags or buy Ready-Made Grow Bags ones. Because it is such a simple design, & we wanted many, we decided to DIY.